
With Microsoft Defender for Office 365, you can create an attack simulation training to identify vulnerable users and mitigate potential threats before they impact your organization.
Think before you click
Understanding the intricacies of cybersecurity is crucial in today’s digital landscape. Attack simulation training is indispensable for users as it provides hands-on experience in recognizing and defending against potential threats. This proactive approach empowers individuals to enhance their security awareness, identify vulnerabilities, and contribute to a more resilient organizational defense against cyber attacks.
Microsoft Defender for Office 365 provides an attack simulation training if you are licensed for Microsoft Defender for Office 365 Plan 2 (add-on licenses or included in subscriptions such as Microsoft 365 E5). Without the need for third-party phishing simulations, this attack simulation training can be easily set up in the Defender portal.
This blog focuses more on the user part of the attack simulation and is an extension of the Microsoft Learn documentation, which already provides a good explanation of how to set up the attack simulation in the Defender portal. We will definitely have a summary of the configuration part as well.
Requirements
1: Required license
All target users must have a Microsoft Defender for Office 365 Plan 2 (add-on licenses or included in subscriptions such as Microsoft 365 E5).
2: Report message button
You should start by enabling your users to report email messages from the attack simulation using the built-in Report button, which is required for this training. If you haven’t already, activate the built-in Report button.
NOTE: If you are still using the Microsoft Report Message or Report Phishing add-ins, consider transitioning to the built-in report button. These add-ins have security vulnerabilities that make them unsafe for your organization and will be deprecated over time.
Reported messages appear in the User Reported section of the Submissions page, your reporting mailbox, and are visible in the simulation report.
3: Required permissions
Required role: Attack Simulation Administrator
Users in this role can handle every facet of attack simulations, including creation, launch, scheduling, and result review. They have full access to all simulations within the tenant.
The role is available in the Microsoft Defender portal or in Entra ID (e.g. through PIM).
4: Remove external tagging for the default end user notifications address
Once the user clicked on the link and/or logged on to the phishing site, they received an email From notification@attacksimulationtraining.com.
Exclude this email address or domain from your external tagging configuration (Exchange Online mail flow rules or Exchange Online’s External Email Tagging Feature).
You can also use Tenant notifications to change the From address to an internal address.
5: Turn on auditing
In order for Attack simulation training to have reporting capabilities, auditing needs to be enabled.
- Connect to Exchange Online PowerShell
- Enable Organization Customization by running:
Enable-OrganizationCustomization - Then run the following PowerShell command to turn on auditing:
Set-AdminAuditLogConfig -UnifiedAuditLogIngestionEnabled $true
The basic elements of a simulation are:
-
Social Engineering Techniques (e.g., credential harvesting)
-
Payloads: Phishing emails and web pages that you use to launch simulations
- Global Payloads: Includes built-in payloads, such as the
Keep Office 365 Passwordpayload - Tenant Payloads: Can be populated with custom payloads (self-made phishing emails)
- I have some custom-made HTML templates available on my GitHub repository, feel free to use them. The HTML content can be copied and pasted directly into the Configure Payload section. For custom payloads, you can use the available dynamic tags such as
${firstName}and${phishingUrl}. A full list of dynamic tags can be found in the Custom Payloads section on Microsoft Learn.
- I have some custom-made HTML templates available on my GitHub repository, feel free to use them. The HTML content can be copied and pasted directly into the Configure Payload section. For custom payloads, you can use the available dynamic tags such as
- Global Payloads: Includes built-in payloads, such as the
NOTE: Images that you use in tenant payloads may be blocked with a message that the sender is not in the Outlook Safe Senders list. This happens by default because Outlook is configured to block automatic image downloads in messages from the Internet.
-
Login Pages: Phish web login page for credential harvesting and link in attachment techniques
- Global Login Pages: Includes built-in login pages, such as the Microsoft login page
- Tenant Login Pages: Includes custom login pages, such as a custom Microsoft login page with corporate branding
-
Phish Landing Pages: Provides a learning moment for the user after being phished
- Global Phish Landing Pages: Includes built-in phish landing pages
- Tenant Phish Landing Pages: Includes custom landing pages, such as with corporate branding
-
End user notifications
- Global notifications: Includes built-in end user notifications send From
notification@attacksimulationtraining.com - Tenant notifications: Includes custom end user notifications for branding and to set a different From address to an internal mailbox
- Global notifications: Includes built-in end user notifications send From
NOTE: Images that you use in end user notifications may be blocked with a message that the sender is not in the Outlook Safe Senders list. This happens by default because Outlook is configured to block automatic image downloads in messages from the Internet.
- Target users: Who will receive the simulated phishing message and on what schedule
- All users or specific users and groups
- All users are all mailboxes (user and shared) and resources (room and equipment) in Exchange Online
- Supported groups: Microsoft 365 (static and dynamic), distribution list (static only) and mail-enabled security (static only).
- All users or specific users and groups
Creating an attack simulation training
After the requirements are set, you can begin creating an attack simulation in the Microsoft Defender Portal.
-
You have the option to create:
- Simulate a phishing attack
- These simulations test your security policies and practices, as well as train your employees to increase their awareness and decrease their susceptibility to attacks.
- Using automated flows for Attack simulation
- Creating a simulation automation is similar to creating an individual simulation, except for the ability to select multiple techniques, payloads, and the automation schedule.
- Simulate a phishing attack
-
You also have the ability to create:
- Training campaigns for Attack simulation
- Instead of creating and launching simulated phishing attacks that eventually lead to training, you can create and assign Training campaigns directly to users.
- Payload automations for Attack simulation training
- Payload automations, also known as payload harvesting, can collect data from real-world phishing attacks reported as phishing by users within your organization (and verified by Microsoft as phishing). You can define specific conditions to identify in phishing attacks, such as recipient details, social engineering techniques, or sender information.
- Training campaigns for Attack simulation
Automation vs. Individual simulations
Automated Simulations
While Automated Simulations can be a great fit for your organization, there are some important considerations. For example, if you plan to automate a simulation for an entire year (which is the maximum duration for an automation schedule), you won’t be able to modify the content after the initial setup. This means you’ll be locked into the configuration choices made at the beginning.
Individual Simulations
Individual simulations, on the other hand, offer more flexibility, especially if you prefer to run separate monthly simulations. They allow for adjustments and customizations between campaigns.
Payload Selection
Automated simulation - Payload Selection:
When setting up an automated simulation, you have two options for payload selection:
- Manually select: Up to 20 payloads, including both global and tenant-specific payloads.
- Randomize: Allowing Microsoft to select payloads automatically.
NOTE: It’s important to note that even in an automated simulation, only one payload is sent out per launch. All targeted users will receive the same payload (phishing email).
Individual Simulation - Payload Selection:
- Each simulation allows only one payload to be configured. To use different payloads, target groups, or send times, you’ll need to create separate individual simulations for each configuration.
Schedule Selection
Automated simulation - Schedule Selection:
When configuring the automation schedule, you have two options:
- Randomized Schedule: Can start simulations with randomize send times. However, you cannot limit it to just one simulation per month. Instead, you can schedule up to 10 simulations per year on specific allowed days.
- Fixed Schedule: where simulations follow a weekly or monthly recurrence. However, they will always occur on a specific day of the week or month, and you cannot customize the send time.
NOTE: Neither of the automation schedules supports randomized delivery during business hours (e.g., between 08:00 AM and 5:00 PM, Monday through Friday).
Each automated simulation will be listed in the Simulations tab with a naming convention like: AutomatedSimulation_PayloadName [Technique]_date
Individual Simulation - Schedule Selection:
Each individual simulation can be configured to start at a different time. You can create a new individual simulation each month and schedule it up to two weeks in preparation for the launch date.
Simulation schedule comparison
| Action | Automation randomized schedule | Automation fixed schedule | Individual schedule |
|---|---|---|---|
| Random send time | Yes | No | Yes* |
| Monthly | No | Yes | Yes** |
| Static send time | No | No | Yes |
- *Each individual simulation can be configured to start at a specific static time, for example, during business hours (e.g., between 08:00 AM and 5:00 PM, Monday through Friday).
- **You can create an individual simulation each month and schedule it up to two weeks before the launch date.
The best practices of a simulation are:
-
Individual simulations: Consider creating individual monthly simulations and plan a yearly schedule that varies the simulation dates and times each month to keep users engaged and reduce predictability. Keep in mind that all target users will receive the same payload. However, using individual monthly simulations gives you greater control and flexibility over content, timing, and targeting throughout the year.
-
Target users: Include all Microsoft Defender for Office Plan 2 users in your organization by using a dynamic Microsoft 365 group with the following syntax:
user.assignedPlans -any (assignedPlan.servicePlanId -eq "8e0c0a52-6a6c-4d40-8370-dd62790dcd70" -and assignedPlan.capabilityStatus -eq "Enabled")
The servicePlanId
8e0c0a52-6a6c-4d40-8370-dd62790dcd70corresponds to Microsoft Defender for Office Plan 2 and remains the same across all tenants.
If you want to target a specific department, such as HR, you can use the following syntax:
(user.department -eq "HR")
NOTE: Users may appear in the report as
FailedToDeliverEmailbecause they are blocked from signing in. This is expected behavior, and you can filter them out in the report.
- Training: By enabling training during an attack simulation, Microsoft can assign courses and modules customized to the user’s previous simulation and training results through learning pathways. The training is based on user interactions, specifically whether they clicked and submitted their credentials. A compromised user may receive two training sessions. You can choose standalone training campaigns and disable training within the attack simulation. However, this approach will not be as adaptive as the learning pathways provided through training campaigns within an attack simulation.
Progress of the attack simulation
We will take a deep dive into a Credential Harvest simulation, one of the several social engineering techniques to choose from. Create the Credential Harvest simulation using the steps provided by Microsoft to simulate a phishing attack and select the global payload: Keep Office 365 Password. Upon completion, you should have a simulation in progress.

The attack simulation then begins with users receiving credential phishing emails with the selected payload.
Payload:
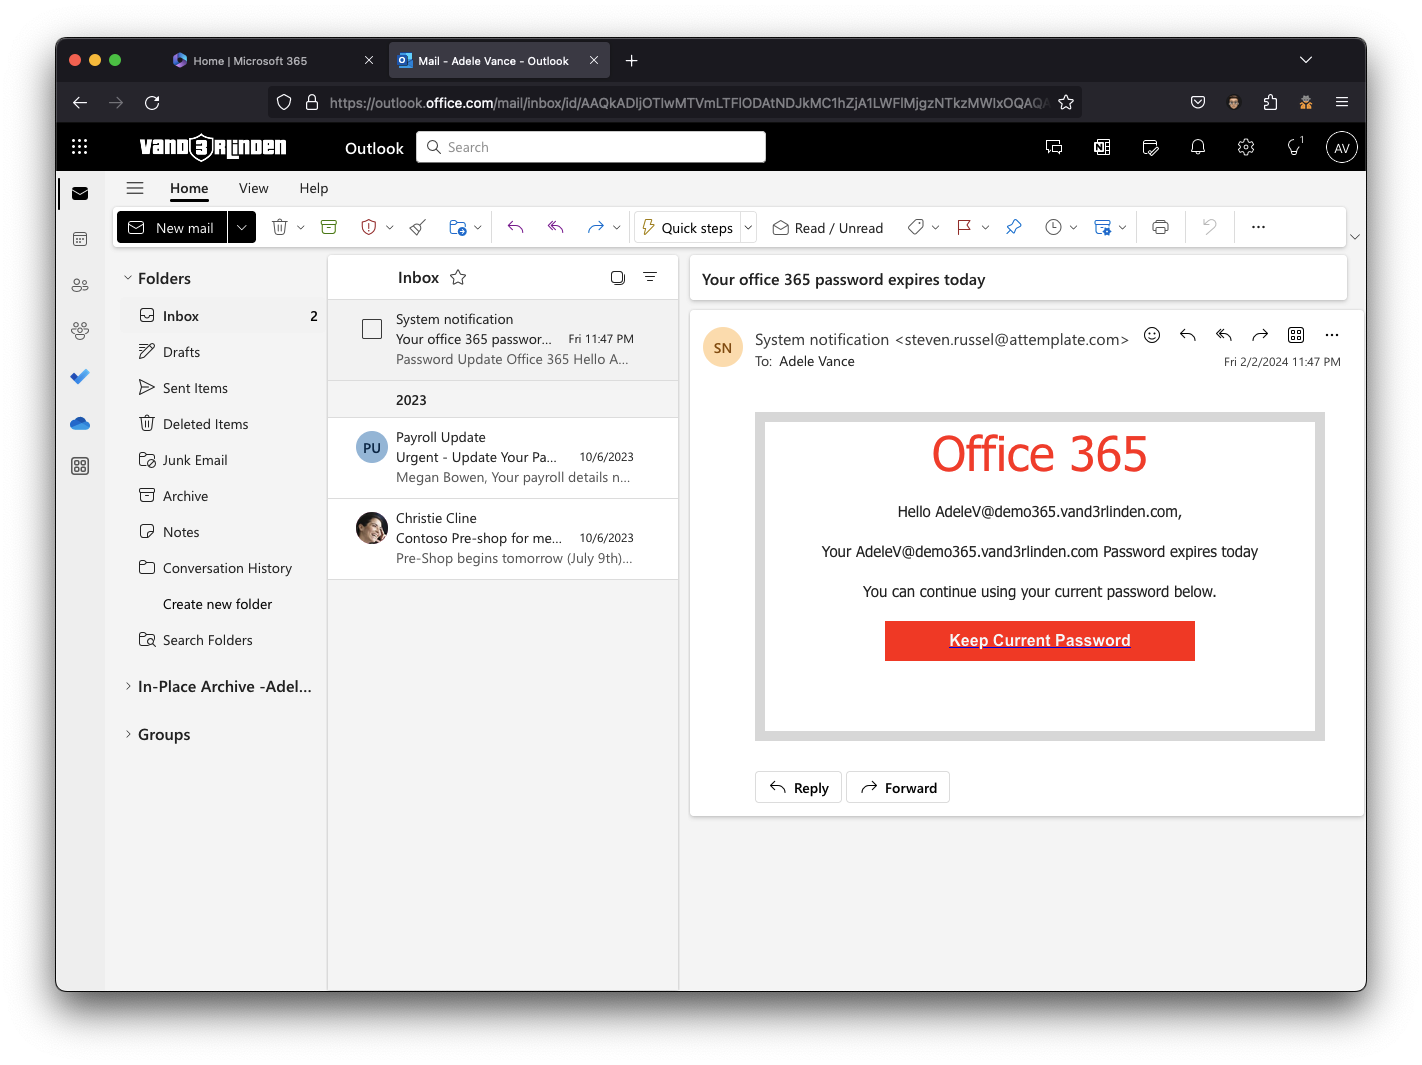
A user can click on the link, which creates an outbound connection to the selected Login Page.
Login Page:
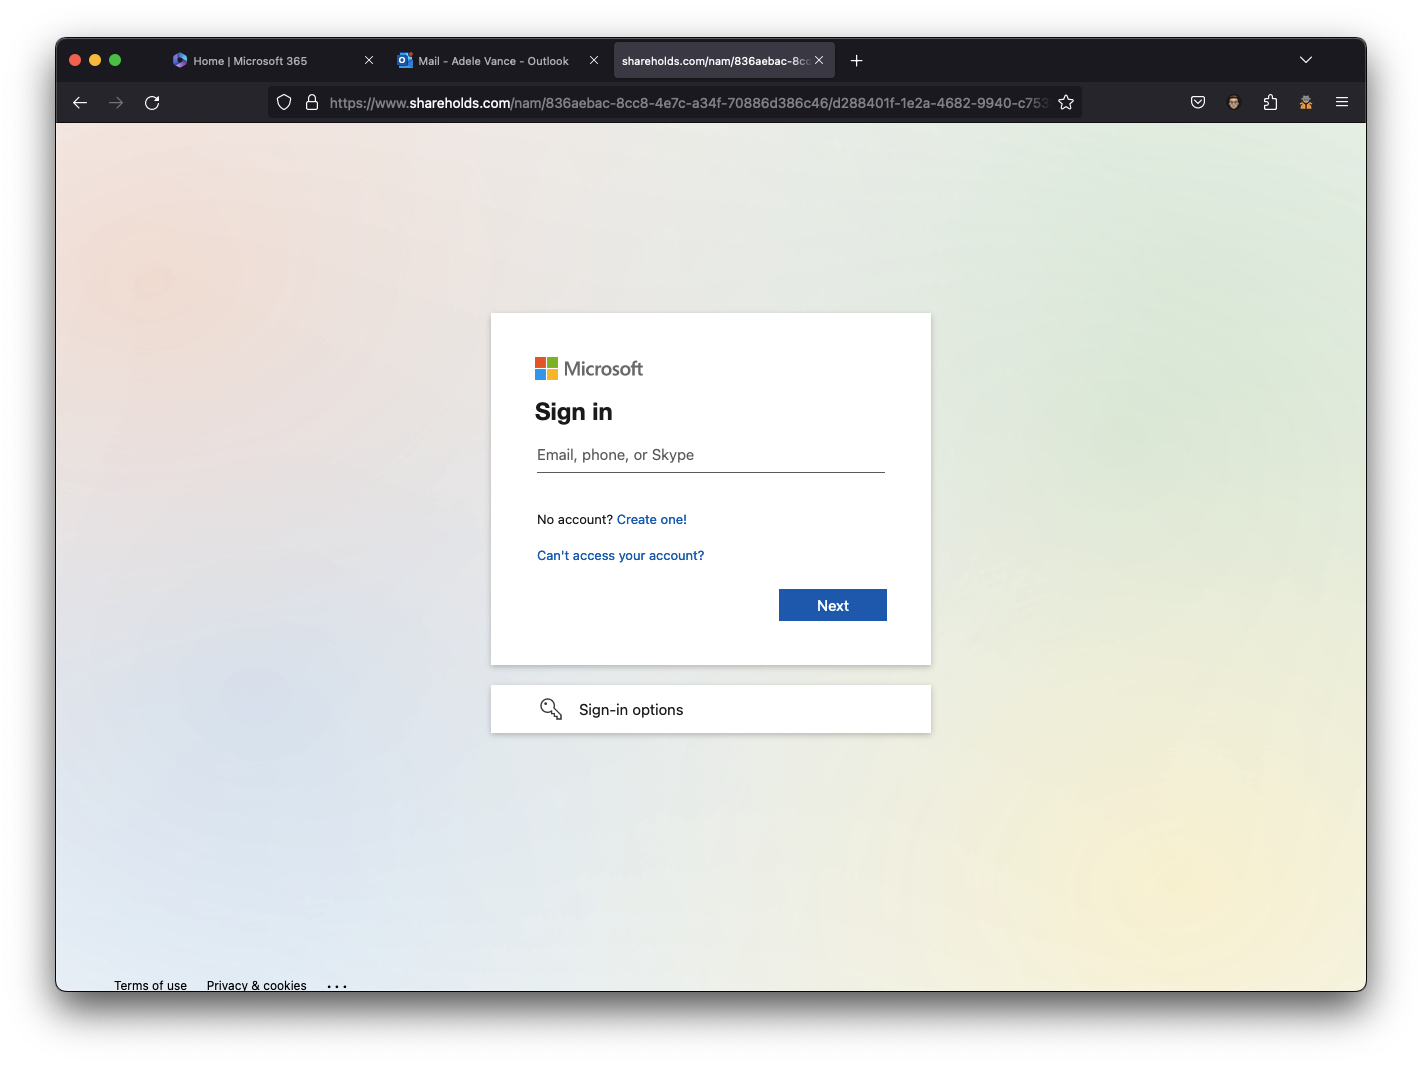
If the user logs in, they will land on the phish landing page that provides a learning moment to the user after getting phished.
Phish Landing Page:
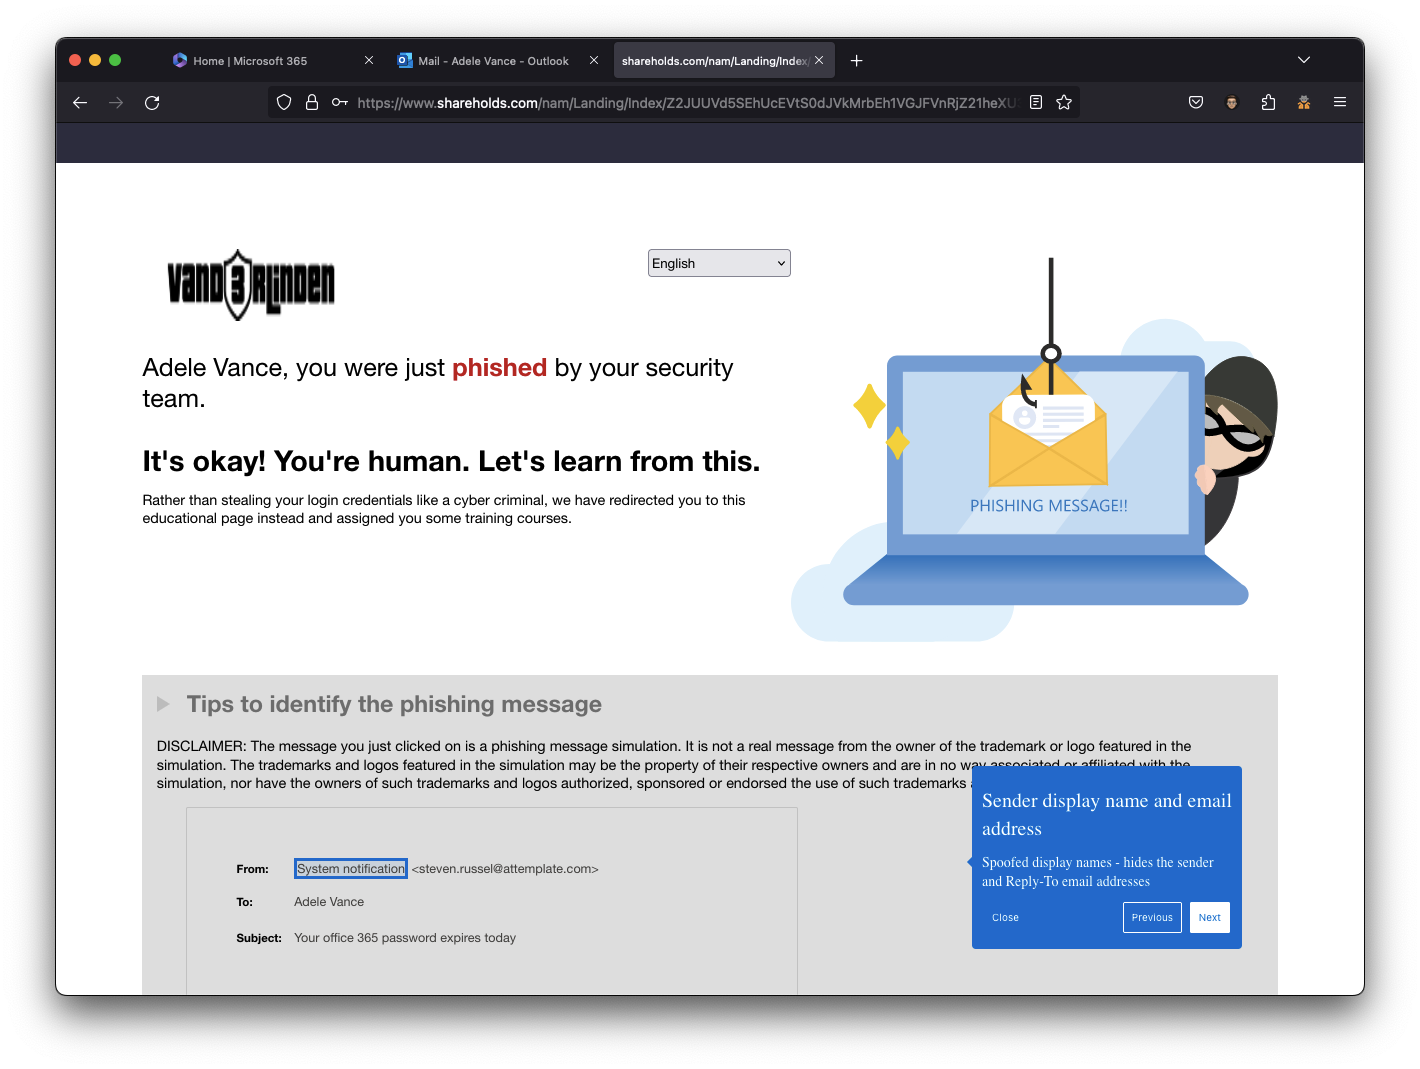
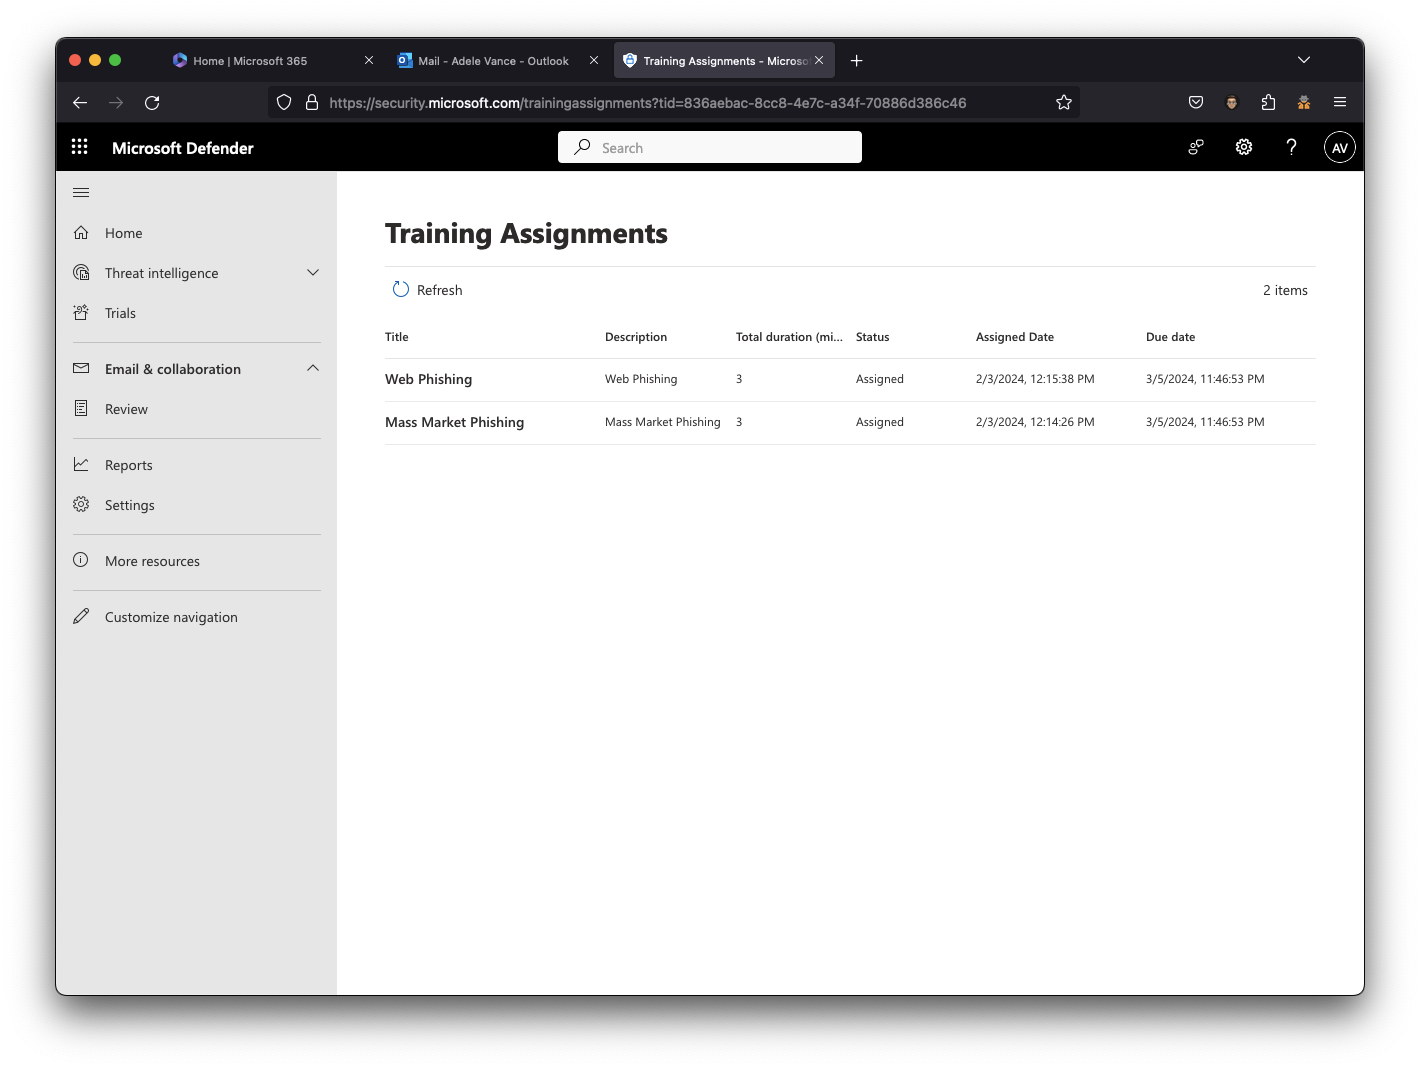
Once the user clicked on the link and logged in, they received an email from notification@attacksimulationtraining.com for each action to complete a training course.
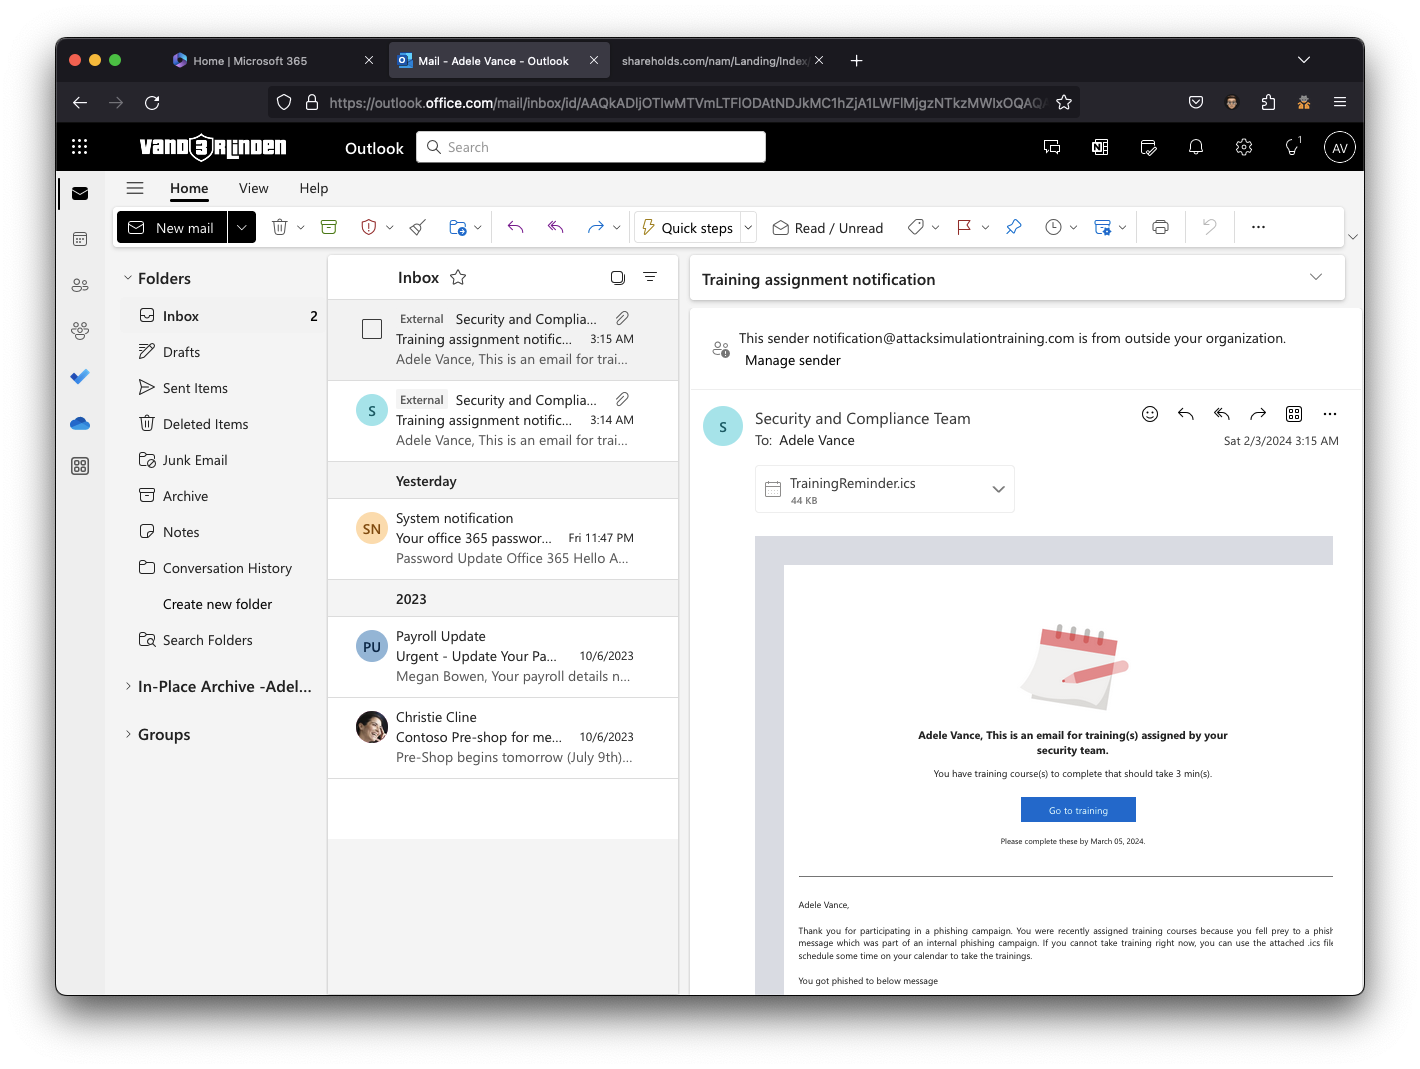
NOTE: You should remove the External tag for the notification email. To do so, run the cmdlet
Set-ExternalInOutlook -AllowList @{Add="attacksimulationtraining.com"}by using the Exchange Online PowerShell module. You can also use Tenant notifcations to change the content or from address.
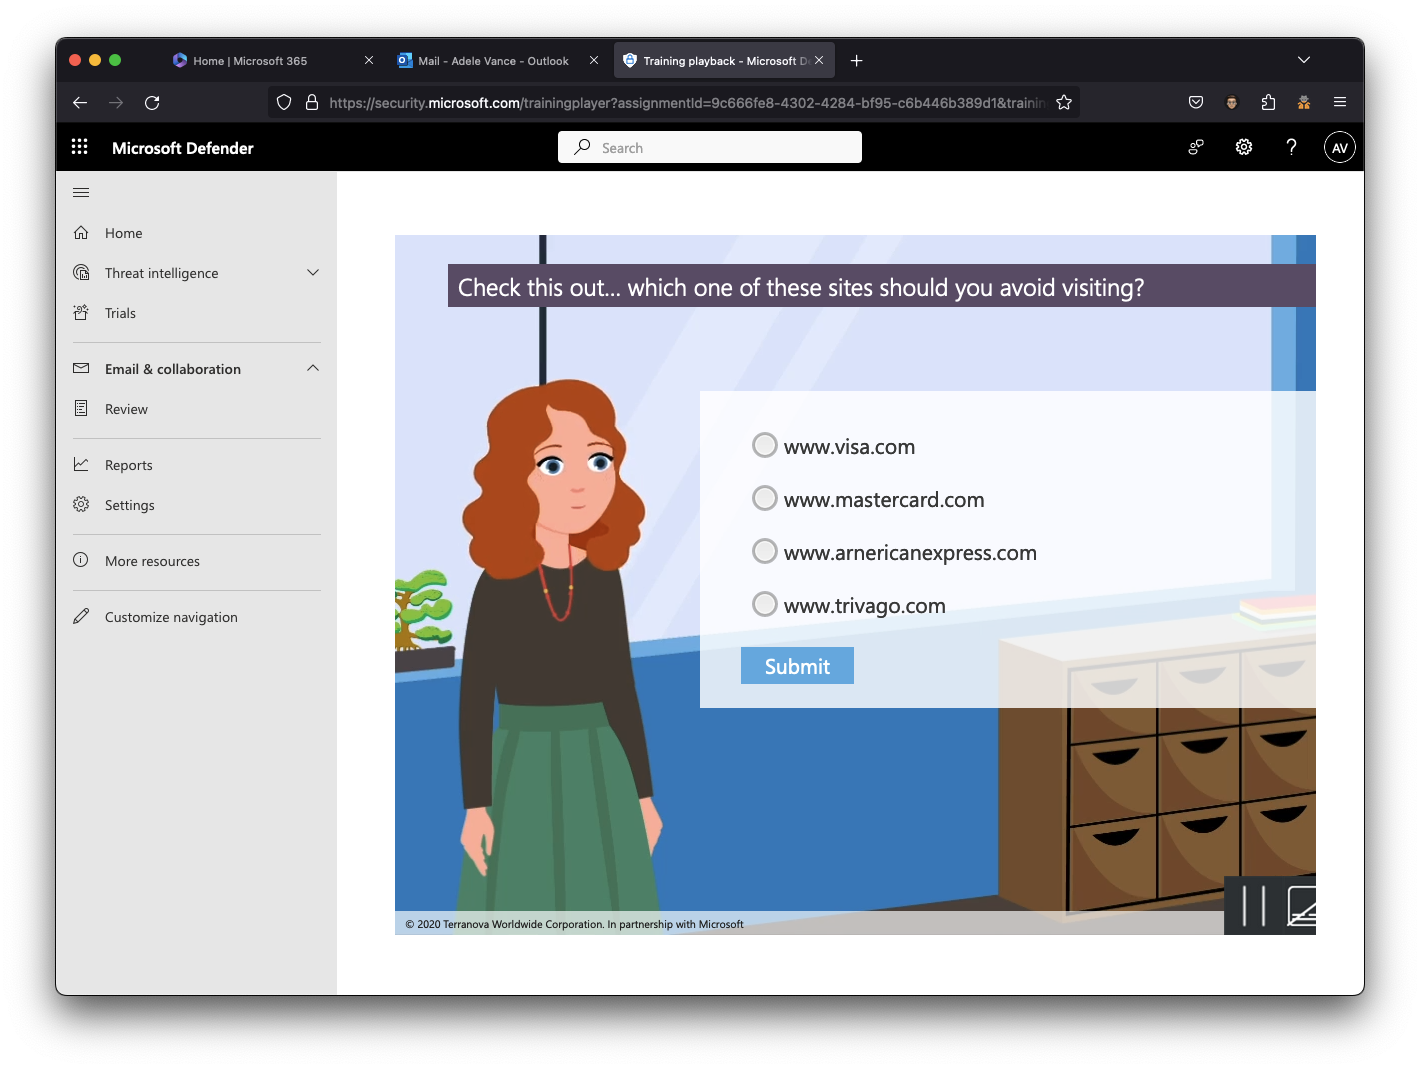
The link will take the user to the Defender portal to complete the courses at https://security.microsoft.com/trainingassignments. If the training is available in the user’s default language at https://myaccount.microsoft.com/settingsandprivacy/language, it will automatically be delivered in that language.
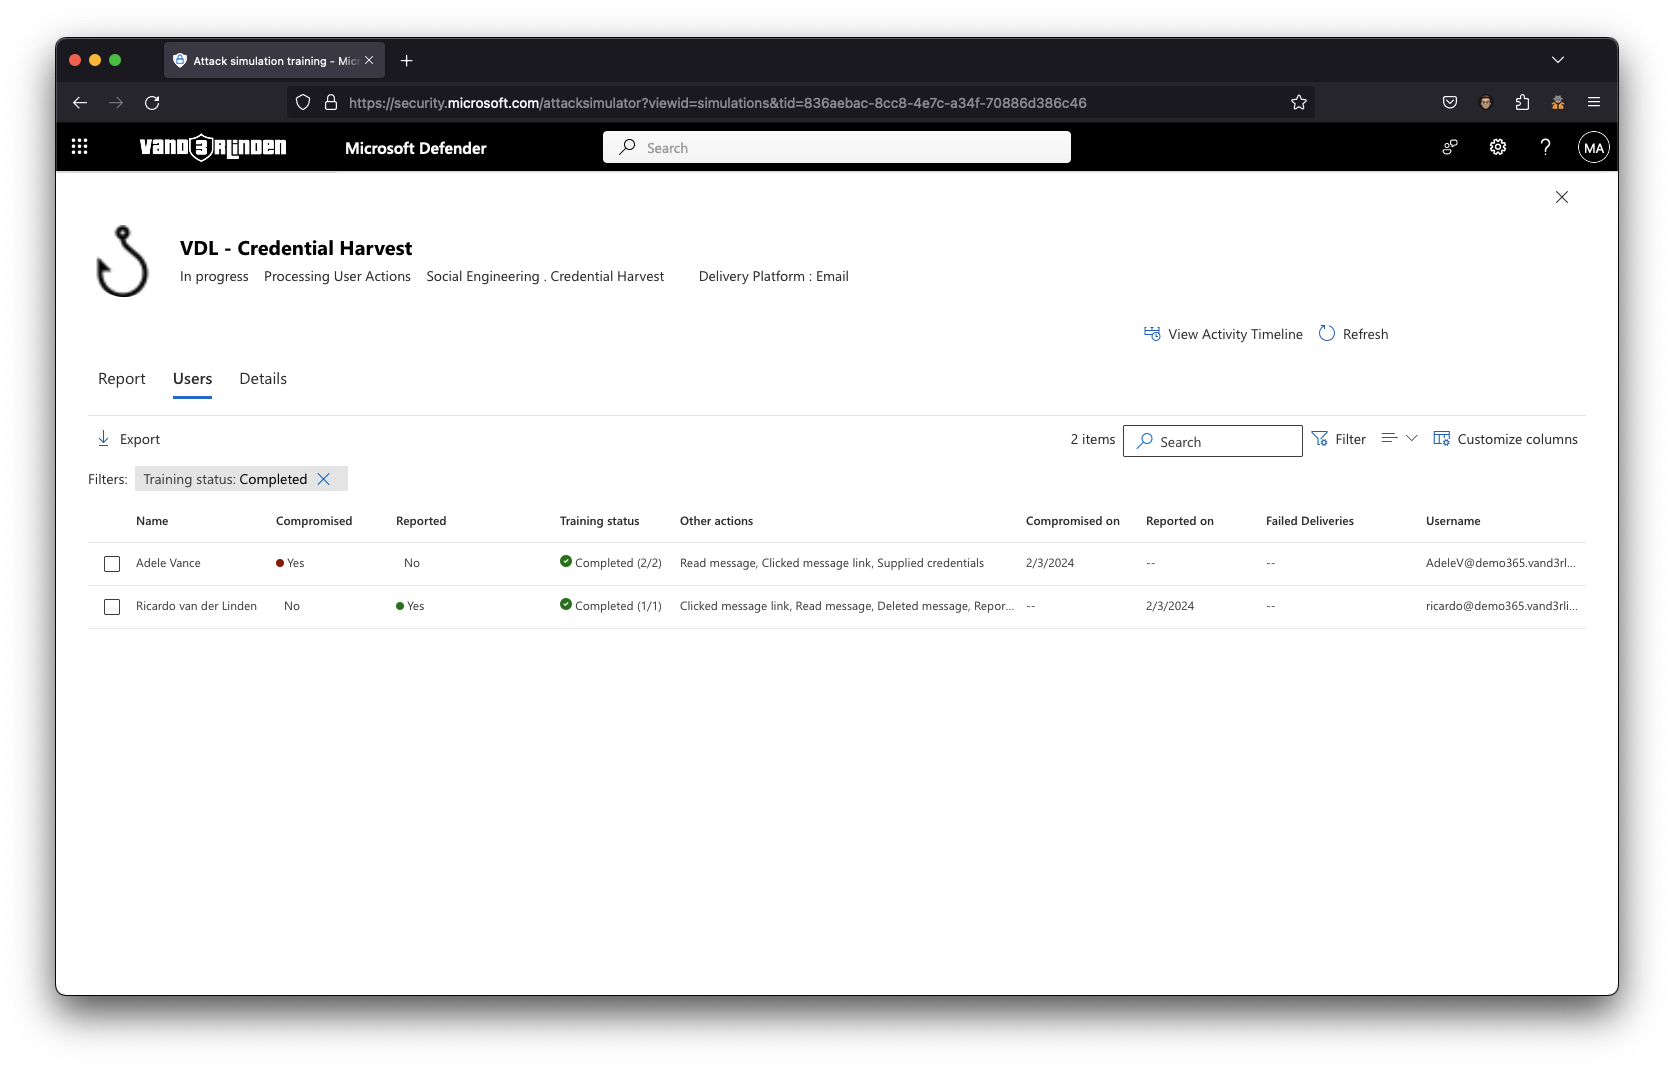
The simulation report allows you to analyze how your users performed in the attack simulation.
Conlusion
Despite advanced security measures, phishing tactics continue to evolve, making it difficult to catch every attempt. Thereby user awareness is important because users play a critical role in identifying and avoiding potential threats.
Reference
- Attack simulation training documentation
- Supported target users
- Payloads in Attack simulation training
- Automation Schedule details
- Attack simulation training deployment considerations and FAQ
- Turn on auditing
- Manage rules for dynamic membership groups in Microsoft Entra ID
- Product names and service plan identifiers for licensing