
In this post, you will learn how to enable and use SMTP DANE with DNSSEC in Exchange Online.
While outbound SMTP DANE with DNSSEC in Exchange Online has been enabled since 2022, Microsoft is has rolling out inbound SMTP DANE with DNSSEC in Exchange Online since late 2024.
For a deeper understanding of DNSSEC and DANE, take a look at my earlier blog post.
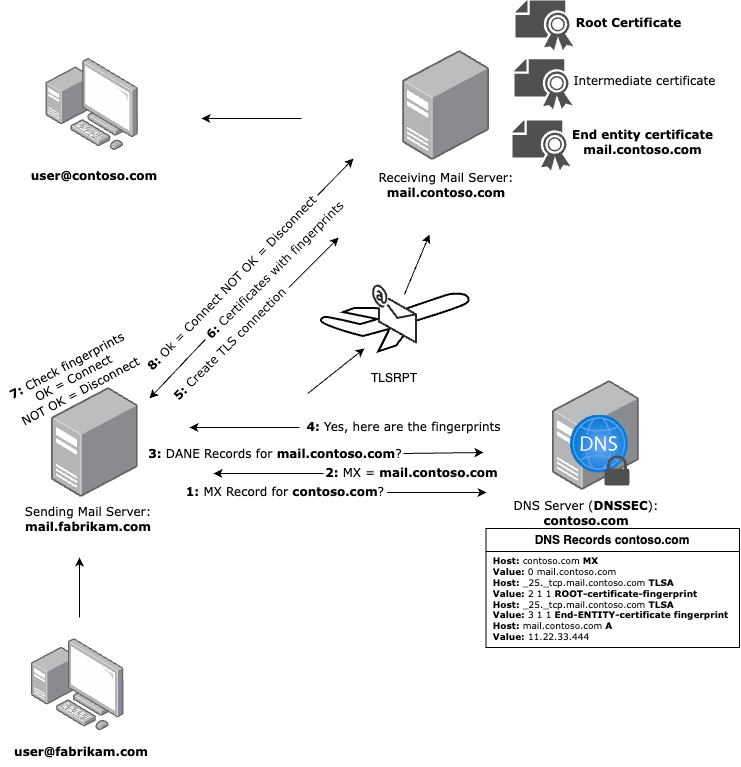
How SMTP DANE with DNSSEC works
SMTP DANE is a transport security mechanism (TLS enforcement) that protects SMTP delivery to a domain by using DNSSEC validated TLSA records. It enables a sending (outbound) mail server to verify the TLS certificate of a receiving (inbound) mail server using TLSA records published in the DNS on the MX host of the receiving domain. The sending (outbound) mail server validates the connection by comparing the TLS fingerprints obtained from the TLSA records with the fingerprints presented by the receiving (inbound) mail server.
Since port 25 does not use authentication (MTA-to-MTA delivery), implementing SMTP DANE enforces TLS encryption and certificate validation between MTA’s, this ensures the confidentiality of email delivery.
The flow of SMTP DANE on a mailserver
- Outbound SMTP DANE with DNSSEC
sending mail server: Requests DANETLSArecords of the receiving domain’sMXrecord. - Inbound SMTP DANE with DNSSEC
receiving mail server: Requires DNSSEC and DANETLSArecords that can be requested by the sending mail server. - TLS Reporting (TLSRPT): If the sending mail server encounters issues delivering an email, it can use the receiving server’s
TLSRPTrecord to report the problem or confirm that the TLS session was successfully established.
Prerequisites
-
Before you enable inbound SMTP DANE with DNSSEC in Exchange Online for a domain, you must have added the domain as an Accepted domain and the domain status must be Healthy in the Microsoft 365 Admin Center. The current domain’s
MXrecord must have a priority of0or10and must not have a fallback or secondaryMXrecord. -
Make sure that DNSSEC is enabled for your domain at your DNS provider.
- You can use the DNSSEC Analyzer from VeriSign, to check if your DNS provider have DNSSEC enabled for your domain.
-
You must be authorized to access Exchange Online PowerShell and to run the cmdlets.
-
The domain you want to secure with inbound SMTP DANE with DNSSEC must referenced to an
MXrecord such asyourdomain-com.mail.protection.outlook.com. -
To configure inbound SMTP DANE with DNSSEC for your Accepted Domain, such as
yourdomain.com, ensure that:- If this domain is referenced in any smarthost configurations, or in any connectors, you need to switch the smarthost name to
tenantname.mail.protection.outlook.com - Your business partners update their connectors to
tenantname.onmicrosoft.comortenantname.mail.protection.outlook.comto avoid failures. After enabling DANE, partners can switch to the newyourdomain-com.<random>.mx.microsoftendpoint to restore the original connection.
- If this domain is referenced in any smarthost configurations, or in any connectors, you need to switch the smarthost name to
Set up inbound SMTP DANE with DNSSEC in Exchange Online
Below is a simplified version of the implementation compared to the official Microsoft Learn documentation.
- Update the
TTLof your existingMXrecord to the lowest possible value (not lower than30seconds). Then, wait for the previousTTLto expire before proceeding. For example, if theTTLof your existingMXrecord was3600seconds or1hour before you changed it, you need to wait 1 hour before proceeding.
- Connect to Exchange Online PowerShell
If you’re using MTA-STS, you’ll need to set your policy mode to
testingduring configuration, and set it back toenforcedafter configuration.
- Enable DNSSEC on your accepted domain by running the cmdlet in PowerShell:
Enable-DnssecForVerifiedDomain -DomainName yourdomain.com

- Take the
DnssecMxValuevalue, navigate to the DNS registrar hosting the domain, add a newMXrecord:20 yourdomain-com.<random>.mx.microsoftand set theTTLto the lowest possible value (not lower than30seconds).

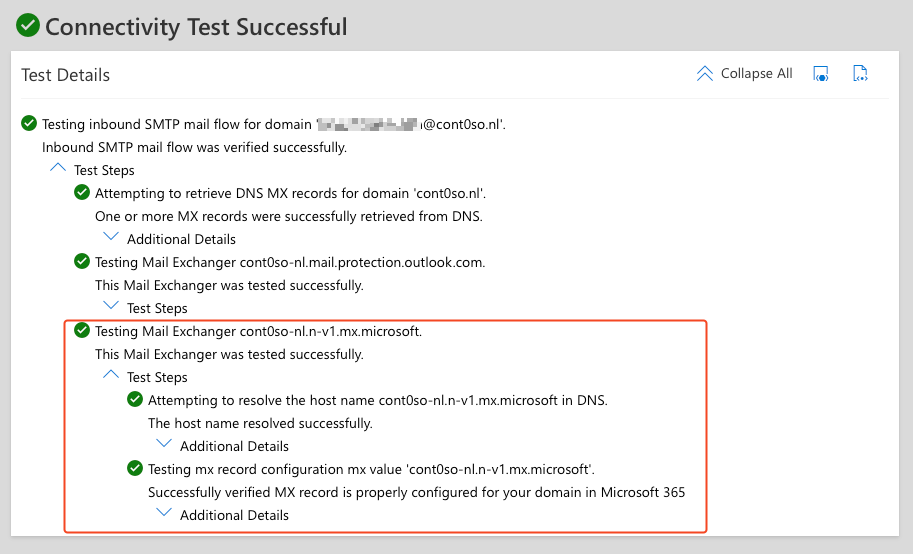
- Verify that the new
MXis working via the Inbound SMTP Email test
- Change the priority of the legacy
MXrecordyourdomain-com.mail.protection.outlook.comfrom current priority to30(30 yourdomain-com.mail.protection.outlook.com)

Wait a minute
- Change the priority of the new
MXrecord to0(0 yourdomain-com.<random>.mx.microsoft)

Wait a minute
- Delete the legacy
MXrecordyourdomain-com.mail.protection.outlook.com

Wait a minute
- Update the
TTLfor the newMXrecordyourdomain-com.<random>.mx.microsoftto3600seconds or1hour

- Enable SMTP DANE for that same domain once the DNSSEC enablement is complete by running the cmdlet:
Enable-SmtpDaneInbound -DomainName yourdomain.com

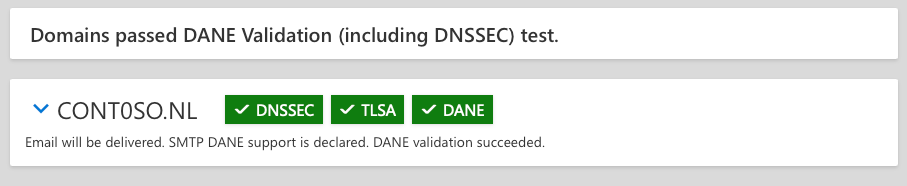
- Verify that the TLSA record has been propagated (this can take 15-30 minutes) by using the DANE Validation in Microsoft Remote Connectivity Analyzer
- Check the health of your domain’s
MXrecord in the Microsoft 365 Admin Center under ‘DNS Records’.

Cmdlets to get DNSSEC and SMTP DANE configuration settings in Exchange Online
# DNSSEC
Get-DnssecStatusForVerifiedDomain -DomainName yourdomain.com | Select-Object DnssecFeatureStatus

$DNSSEC = Get-DnssecStatusForVerifiedDomain -DomainName yourdomain.com
$DNSSEC.ExpectedMxRecord

$DNSSEC = Get-DnssecStatusForVerifiedDomain -DomainName yourdomain.com
$DNSSEC.DnsValidation

$DNSSEC = Get-DnssecStatusForVerifiedDomain -DomainName yourdomain.com
$DNSSEC.MxValidation

# DNSSEC - MTA-STS Policy validation (check the validation only if you use an MTA-STS policy)
$DNSSEC = Get-DnssecStatusForVerifiedDomain -DomainName yourdomain.com
$DNSSEC.MtaStsValidation

# SMTP DANE
Get-SmtpDaneInboundStatus -DomainName yourdomain.com
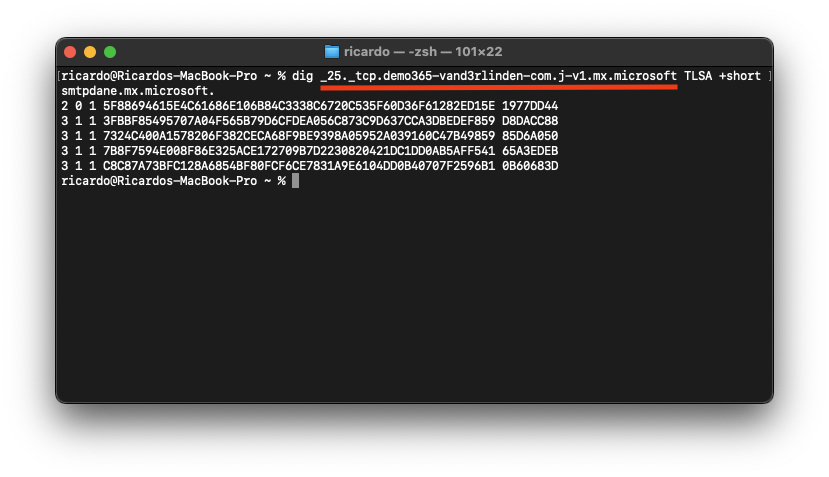
Validate the TLSA records
SMTP DANE TLSA records for a receiving mail server should be located at _25._tcp.mx-host, where mx-host is the hostname of the receiving mail server (the MX value for inbound mail).
You can validate the TLSA records for an mx-host by using the dig command-line tool:
- Value:
_25._tcp.yourdomain-com.<random>.mx.microsoft - Type:
TLSA

You can also use an SMTP DANE/TLSA validator, such as the one provided by Mailhardener, to check whether TLSA records for SMTP DANE are configured correctly.
Rollback the change
Since we carefully added the DNSSEC-signed MX record mx.microsoft alongside the existing mail.protection.outlook.com MX record, you can safely make this change without worrying about inbound email interruption. If something does go wrong, the change can be rolled back by doing the following:
- Disable SMTP DANE:
Disable-SmtpDaneInbound -DomainName yourdomain.com - Run:
Get-MxRecordReport -Domain yourdomain.comto get your new current MX record - Create a new MX record in your public DNS with the following hostname value and set the priority to
20:20 yourdomain-com.mail.protection.outlook.com - Make sure the MX record you created in step 2 is working by using the Microsoft Remote Connectivity Analyzer
- If your mail flow works with the
mail.protection.outlook.comMX record, run the following command:Disable-DnssecForVerifiedDomain -DomainName yourdomain.com - Delete the DNSSEC MX record in your public DNS:
0 yourdomain-com.<random>.mx.microsoft - Make sure the MX record you created in step 2 is the only MX record, and that it is set to priority
0(highest priority) - Confirm that the MX record matches the value in the Microsoft 365 Admin Center -> Settings -> Domains (first, select the domain, then, select the DNS records)
Activate TLS Reporting (TLSRPT)
TLS Reporting (TLSRPT) is a standard that provides a way to report when the TLS connection could not be established during email transmission.
Implementation of TLSRPT
- Log in to your DNS hosting provider’s management console.
- Add a new TXT record with the following details:
| Host | Type | Value |
|---|---|---|
_smtp._tls.example.com |
TXT |
v=TLSRPTv1; rua=mailto:tlsrpt@example.com |
TLSRPT report handling
If a sending mail server has issues securely delivering email to a receiving mail server, it can use the TLSRPT record published in the public DNS of the receiving domain to determine where to send a report about the problem or to report a successful TLS session.
The reports are received in .json, you can look for the summary tag to check if the TLS connection was failed or successful:
"summary":{"total-successful-session-count":1,"total-failure-session-count":0}
MTA-STS vs. SMTP DANE
Neither SMTP DANE nor MTA-STS is universally better. SMTP DANE provides stronger security, but requires DNSSEC, and not every DNS provider supports DNSSEC yet. MTA-STS is easier to implement and provides good security through HTTPS and DNS. Using the two together can provide the best of both worlds, increasing security through a layered approach.
This layered approach can be beneficial because MTA-STS enforces TLS through a secure HTTPS policy file and validates the TLS certificate of the receiving (inbound) mail server, while SMTP DANE provides similar protection by retrieving TLS fingerprints from the TLSA records from the MX host of the receiving domain and comparing them with the fingerprints presented by the receiving (inbound) mail server of the receiving domain.
MTA-STS and SMTP DANE vs. Outbound email authentication
While SPF, DKIM, and DMARC focus on verifying the authenticity of email messages and ensuring they are sent from authorized domains for outbound email, SMTP DANE and MTA-STS focuses specifically on securely establishing TLS connections between mail servers. These protocols ensures that the sending mail server connects to the intended receiving inbound mail server with verified encryption.