
In this post you will learn to understand how the DNS protocols SPF, DKIM and DMARC work together to protect your domain from phishers and spammers.
Why deploy SPF, DKIM, and DMARC?
SPF, DKIM, and DMARC are essential authentication protocols for outbound email that help prevent spoofing in phishing attacks. When enabled together, these protocols strengthen your domain’s security and build trust with receiving mail servers by ensuring that email sent from your domain is legitimate and trustworthy.
SPF, DKIM and DMARC - Comparison table:
| Protocol | Purpose |
|---|---|
| SPF | Verifies sender authorization by checking the sender’s IP address |
| DKIM | Ensures message integrity through cryptographic signature verification, confirming that the message headers and the email body have not been changed |
| DMARC | Enforces a policy by requiring alignment between SPF and/or DKIM |
P1 vs. P2 - Sender explanation table:
In this blog, you will read a lot about the P1 and P2 sender. Please refer to the table below to become familiar with these terms.
| Postal Letter | Precise Term | Protected by |
|---|---|---|
| Sender on envelope (Envelope sender) | RFC5321.MailFrom (P1 Sender) |
SPF |
| Author on letter (Header sender) | RFC5322.From (P2 Sender) |
DKIM + DMARC |
SPF
What is SPF
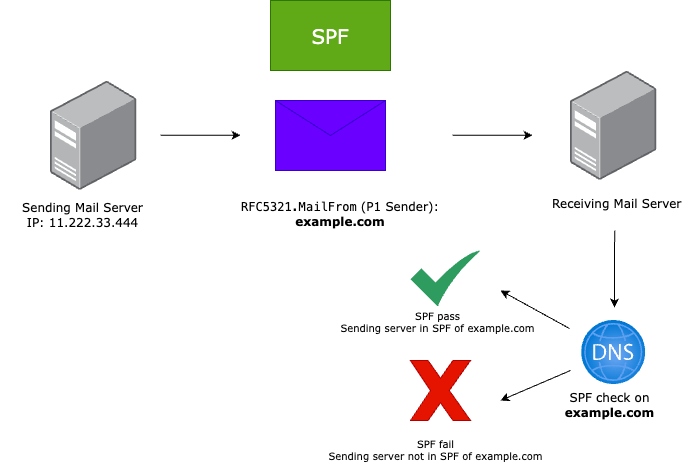
SPF (Sender Policy Framework) is a protocol that aims to reduce spam. SPF can reduce email spoofing and spam by determining if the sender is authorized to send on behalf of the listed sender.
How SPF works
Imagine that you have an SPF record that looks like:
v=spf1 ip4:11.222.33.444 include:_spf.domain.com ~all
If an unauthorized server sends on behalf of your domain, the email will get a spf=SoftFail in the message header because the IP is not listed in your SPF record.
SPF will pass if the sender’s IP is added to the SPF record for the P1 Sender domain.
NOTE: Later, you will read about the difference between SPF Softfail and Hardfail, as well as what is considered best practice.
NOTE: SPF always checks the exact domain of the P1 sender. So, if you send from a subdomain, the receiving mail server looks for an SPF record on the subdomain and does not fall back to the root domain.
How SPF evaluation works
Implementation of SPF
When you add your domain to Microsoft 365, Microsoft will ask you to provide an SPF record, such as v=spf1 include:spf.protection.outlook.com ~all. If you have more allowed senders, you must include them in the SPF record. For example v=spf1 ip4:11.222.33.444 include:spf.protection.outlook.com include:_spf.domain.com ~all
The SPF record will vary for each domain; therefore, it is important to understand the following when implementing an SPF record:
- Can only have 255 characters, but it can be split to multiple strings in a single record, most DNS providers handle this automatically.
- Example:
"v=spf1 first string" "second string ~all"
- Example:
- Can take up to a maximum of 10 DNS Lookups, such as
include:spf.protection.outlook.com(this entry costs 1 DNS lookup, with no additional child lookups).
CAUTION: You should take steps to stay well under 10 DNS lookups. Because if a vendor decides to add another DNS lookup within its SPF include (child lookup). Your SPF record will become inaccurate because it has reached the DNS lookup limit, which may result in email delivery problems.
Tips to avoid reaching the 10 DNS lookups limit
- Flatten your SPF record, as IP addresses do not consume any DNS lookups and therefore they do not require DNS resolution (translating friendly domain names into IP addresses).
- Example:
v=spf1 include:spf.domain.com ~allcan bev=spf1 ip4:11.222.33.444 ip4:11.222.33.444 ~all
- Example:
Not recommended: The problem with flattening is that email service providers can change or add IP addresses without telling you. Then your SPF record will be inaccurate, leading to email delivery problems.
- Configure only DKIM for the P2 sender domain on your mail server or provider. SPF can then use a different P1 sender (such as the domain of your provider, if supported) while DKIM aligns with your domain to maintain DMARC compliance.
Not recommended: It is not best practice to rely only on DKIM validation. If DKIM fails, for example due to slow DNS response, there is no fallback. The best practice is to have both SPF and DKIM correctly aligned.
-
Not using entries like
aandmx, these mechanisms are often useless and probably should not be included in your SPF record (and other duplicate SPF mechanisms). -
Move to vendor traffic with the use of subdomains for SPF authentication, subdomain segmentation creates a new domain dedicated to a particular email provider with its own 10 DNS lookups. Organizations that segment their email providers find there is no need for SPF flattening and will end up with better controls, less attack surface, and limit any spillover effects of a potential cyber incident.
- Subdomain segmentation can be implemented in three ways:
- Using a direct subdomain addresses.
- Check if your email providers have the ability to pass SPF on a subdomain on behalf of your primary domain; passing SPF on a subdomain is still DMARC compliant (assuming your DMARC policy uses the default
aspf=rtag for SPF relaxed mode). - Use an SPF macro to limit a third-party service to sending from a specific address, since services like Salesforce are most often limited to sending from a single email address, such as
invoices@yourdomain.com.
- Subdomain segmentation can be implemented in three ways:
Set up a wildcard SPF hardfail record for unconfigured subdomains
Even if your root domain already uses an SPF softfail/hardfail policy, and your DMARC policy is set to reject for both the root domain (p) and subdomains (sp), adding a wildcard SPF hardfail record for all unconfigured subdomains still adds value to protect your outbound email authentication for your domain (P1 sender domain). Attackers often target unconfigured subdomains, and some receiving mail servers may still evaluate only SPF (P1 sender domain). This creates a gap that attackers could exploit by sending email from an unconfigured subdomain, even when your DMARC subdomain policy (sp) is set to reject.
A wildcard SPF hardfail record closes this gap by blocking any unconfigured subdomain as hardfail that should not send email, while your existing SPF records on the root domain, configured subdomains, and future configured subdomains continue to function normally. Adding this wildcard SPF hardfail record to both sending and non-sending domains helps prevent subdomain abuse for the P1 sender domain.
To implement a wildcard SPF hardfail record, set the following values in your public DNS:
- Host:
* - Value:
v=spf1 -all
NOTE: Since unconfigured subdomains are non-sending domains, you can safely set the wildcard SPF record to a hardfail for your sending domain, just as you would for domains that do not send email.
Softfail or hardfail for sending domains
SPF can get a softfail or a hardfail, you determine that at the end of the record.
-
With
~all: Email originating from a host that not match the record will not pass the SPF evaluation, but will still be tested for other mechanisms (like DKIM). -
With
-all: Email originating from a host that not match the record will not pass the SPF evaluation and be rejected, no further mechanism (like DKIM) may be used.
Most mailbox providers treat SPF softfail (~all) and hardfail (-all) in a similar way. However, when an email fails SPF, such as in cases involving relaying or delegated senders, it may be rejected by the receiving mail server if an SPF hardfail (-all) policy is in place. This can prevent DKIM evaluation on the receiving mail server, which may lead to a DMARC failure.
The SPF hardfail mechanism (-all) is only recommended for domains that do not send email.
For domains that do send email, it is considered best practice to use SPF softfail (~all). This allows that the DKIM evaluation still occur even if SPF fails, helping ensure the email remains DMARC-compliant through DKIM alignment.
DKIM
What is DKIM
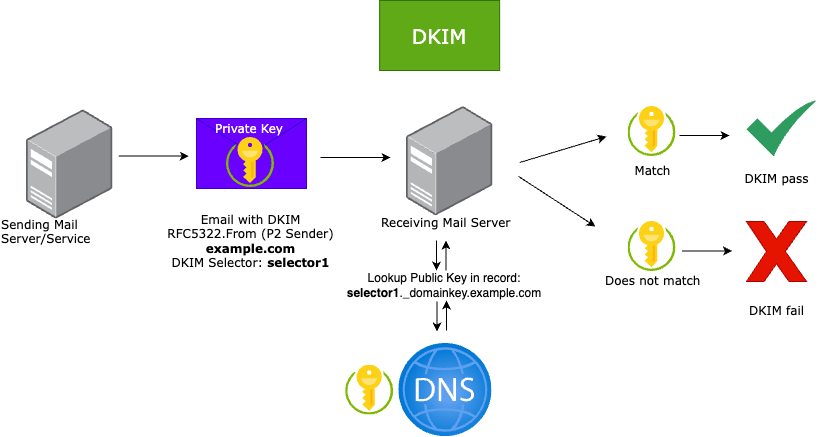
DKIM (DomainKeys Identified Mail) is an email authentication method that allows a receiving mail server to verify that a message was genuinely sent by the claimed domain and that its content has not been altered in transit, by validating the hashed email headers and body.
How DKIM works
When an email is sent, the sending server creates a DKIM signature by hashing selected headers (such as From, Date, and Subject) and the entire email body*. This hash is then signed using the private key of the sending domain, which is stored on the sending server. Because the full body is hashed and included in the signature**, any modification to the email body will cause DKIM validation to fail.
*DKIM does not automatically sign every header, the sending server selects which headers to include, and those headers are listed in the
h=tag inside theDKIM-Signatureheader
**The hash value is stored inside the
DKIM-Signatureheader in thebh=field (a Base64 encoded cryptographic hash of the email body), which used to ensure the integrity of the email content
When the receiving server receive the email, it reads the DKIM-Signature header and makes a DNS lookup using the selector and sending domain, such as selector1._domainkey.yourdomain.com. The public key is retrieved from a TXT record (or via CNAME) in the DNS zone of the sender. For example:
- Hostname:
key1._domainkey.yourdomain.com(TXT) - Value:
v=DKIM1; k=rsa; p=MIIBIjANBgkqhkiG9…(public key)
The receiving server then recalculates the hash of the signed headers and entire body and verifies the signature using the public key. If the hash matches and the signature validates, DKIM passes.
Example DKIM-Signature header in the email:
v=1; a=rsa-sha256; c=relaxed/relaxed; d=yourdomain.com; s=key1; h=From:Date:Subject:Message-ID:Content-Type:MIME; bh=AbCdEfGhIjKlMnOpQrStUvWxYz1234567890=; b=Base64DSignatureValue
How DKIM evaluation works
Implementation of DKIM
You can configure DKIM with a TXT record in your DNS zone for your sending mail servers (such as postfix or sendmail). A DKIM generator can be used to generate a private key for your server and a public key for your DNS.
NOTE: A DKIM record is required for each sending server or mail provider.
How you set up DKIM depends on your sending server or mail provider. For example, configuring DKIM for Salesforce differs from Exchange Online in Microsoft Defender for Office 365. If you’re managing your own mail server and using MTAs like Sendmail or Postfix, you can implement DKIM using tools such as OpenDKIM.
DKIM key rotation procedure
It is important to change your DKIM keys regularly for each sending server or mail provider to prevent adversaries from intercepting and decrypting your DKIM keys. DKIM Key rotation helps to minimize the risk of having a private key compromised.
- Recurring: Every six months for a 2048-bit DKIM key.
- The DKIM key length must be at least 2048-bits.
DKIM key revoke procedure
When you stop using a DKIM key to sign your emails, it is important to keep the published DKIM key active for a period of time (usually 1 or 2 weeks) before removing it from your DNS. This is known to as a cooldown period, designed to ensure that emails previously signed with the DKIM key continue to be successfully validated, even after the key is removed.
IMPORTANT: If there is an indication that your DKIM key has been compromised, you should revoke the key immediately.
After the cooldown period (or if no cooldown period is used), it is recommended to update the DNS record with a revoked value for the p= value, such as: v=DKIM1; p=; This prevents receivers from using any cached values of the revoked key.
An alternative solution is to use an unassociated wildcard DKIM key record:
- Name:
*._domainkey - Content:
v=DKIM1; p= - Type:
TXT
This helps prevent the multiple revoked keys in your public DNS. My recommendation would be to set up this unassociated wildcard DKIM key, rather than having a bunch of revoked keys floating around.
DMARC
What is DMARC
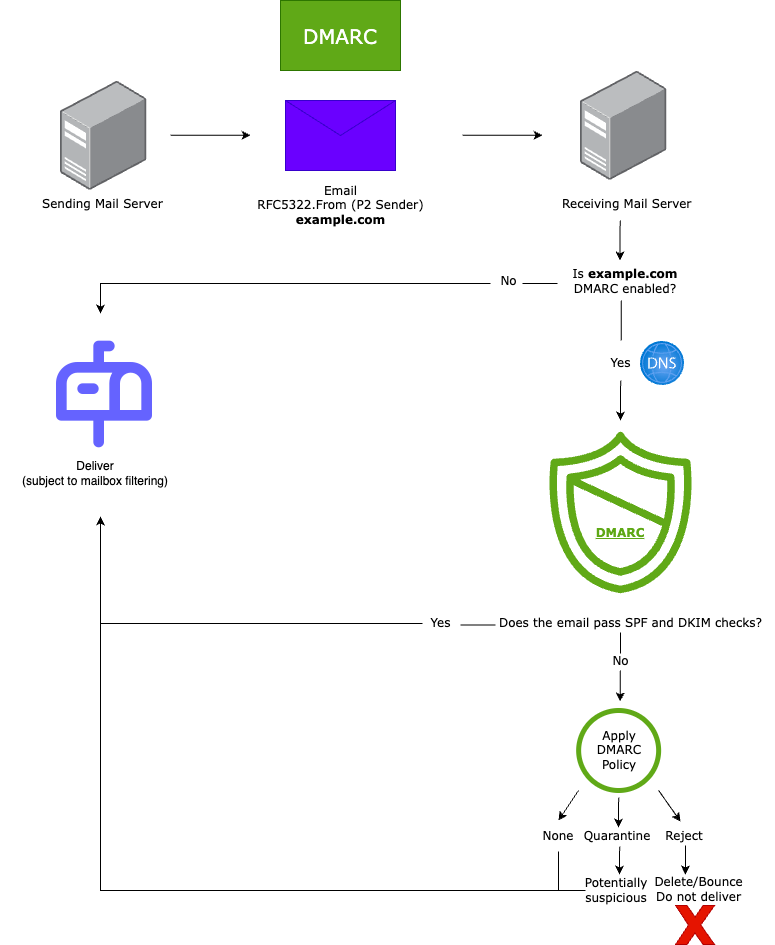
DMARC (Domain-based Message Authentication, Reporting and Conformance) acts as a shield on top of SPF and DKIM. With DMARC, domain owners specify how to handle emails sent on behalf of their domain if those messages fail SPF and/or DKIM checks. This allows them to define whether such emails should be monitored, quarantined, or rejected entirely.
How DMARC works
Once your domain has a DMARC record, any receiving email server can verify the incoming email based on the instructions in the DMARC policy. If the email passes the DMARC authentication, it will be delivered and can be trusted. If the email fails the check, depending on the instructions in the DMARC record, the email can be delivered, quarantined (flagged as potentially suspicious), or rejected.
DMARC will pass when the P1 and P2 sender domains are aligned, and at least one of SPF or DKIM passes with that aligned domain. If the P1 and P2 sender domains are not aligned, then DKIM must pass and align with the P2 domain for DMARC to pass.
Example of a DMARC pass with the P1 and P2 sender domain aligned:

How DMARC evaluation works
IMPORTANT: DMARC does not directly block or allow mail, it depends on how the receiving server is configured to handle messages that fail DMARC (SPF and/or DKIM alignment validation).
Implementation of DMARC
Before enforcing a DMARC policy, it’s important to understand how often DMARC checks might fail for your domain. Jumping straight to a reject policy without visibility can cause legitimate email to be blocked.
You should start by monitoring DMARC failures. This can be done in two ways:
- Manually reviewing DMARC
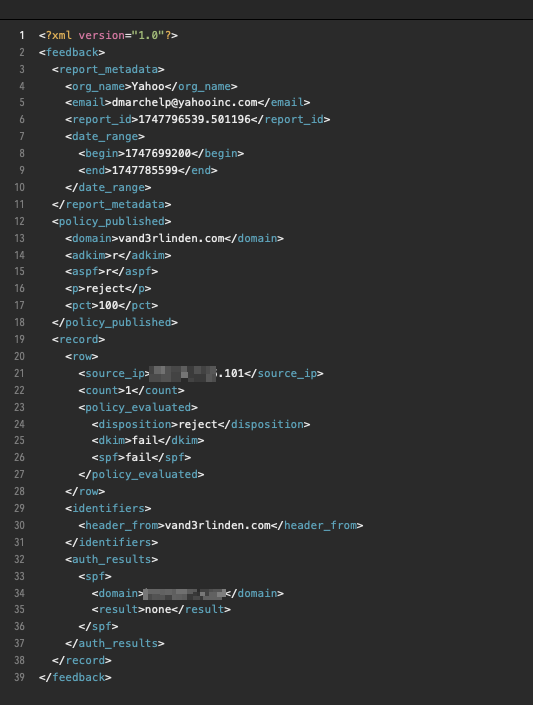
RUAreports to identify which email providers are passing or failing DMARC. However, for high-volume domains, this can be overwhelming and difficult to manage.
RUA report example in .xml:
- Using DMARC monitoring tools allows you to convert
RUAreports into clear visual dashboards, providing more actionable insights than raw IP address data alone. Most tools can associate sending IP addresses with known email providers, such as Microsoft 365 or Salesforce. An example of such a tool is Valimail (free for Microsoft 365 users with an Exchange Online plan). Personally, I do prefer Mailhardener, which is not free for corporate use, but it supports hosting BIMI assets and MTA-STS policies. Both Valimail and Mailhardener can be integrated with Microsoft Entra ID through SSO.
For heavy mail domains, I recommended monitoring the domain for at least three months with the DMARC policy set to none:
- Hostname:
_dmarc - Value:
v=DMARC1; p=none; sp=none; rua=mailto:dmarc_agg@vali.email;
During the monitoring phase, you can adjust your SPF record and set up DKIM for each sending server, and then update your DMARC record to reject once the monitoring phase is complete:
- Value:
v=DMARC1; p=reject; sp=reject; rua=mailto:dmarc_agg@vali.email;
The sp=reject tag means that subdomains will be included; if you don’t want your subdomains to be included in your domain’s root DMARC policy, you can set this to sp=none and list a separate DMARC policy for each subdomain (not recommended).
NOTE: If you do not list the
sp=tag, your subdomains will get the policy from thep=tag.
Clarification on DMARC Monitoring
DMARC monitoring does not provide insights into the total sending volume of your domain. Instead, it only shows authentication results (SPF/DKIM/DMARC pass or fail) based on the aggregate (RUA) reports received.
There are three primary approaches to managing reporting in your DMARC monitoring strategy:
- If you identify an email provider that you do not recognize, but SPF and/or DKIM passes, and your organization has not historically documented all authorized email providers, review your SPF record and
*._domainkeyentries in your public DNS. Remove any entries that are no longer in use. - If you recognize an email provider, but SPF and/or DKIM fails, update your domain’s email authentication settings to align SPF and DKIM for that email provider. This ensures the email provider is properly configured for outbound email authentication.
NOTE: The above two steps should only be neccasary while the DMARC policy is set to
none. During this monitoring phase onnone, you should work towards documenting all authorized email providers and establishing a process for onboarding and offboarding email providers in the future when DMARC is onreject.
- If the email provider is unrecognized and all authentication checks fail (SPF, DKIM, and DMARC), then DMARC is working as intended. No action is required, as these messages will be rejected by most receiving mail servers once your DMARC policy is set to
reject.
Maintenance steps on DMARC Monitoring
-
SPF:
- Perform periodic reviews of the SPF record
- Track and document all changes made to the SPF record
- Maintain an up-to-date list of all authorized sending sources
- Configure alerts to notify the security team whenever modifications to the SPF record are detected
- Perform periodic reviews of the SPF record
-
DKIM:
- Monitor and perform periodic DKIM key rotations
- Recommended: Rotate 2048-bit DKIM keys every six months
- Detect DKIM misalignment, which can be verified through DMARC aggregate reports
- Monitor and perform periodic DKIM key rotations
-
DMARC:
- Regularly review DMARC reports
- Analyze SPF and DKIM pass and fail results
- Investigate any identified anomalies
- Such as: Detect potential abuse from legitimate sending sources with an abnormal volume of activity, which may indicate compromised sources
- Identify DKIM and SPF misalignment issues
- Regularly review DMARC reports
DMARC policy explanation
| Policy | Value | Meaning |
|---|---|---|
| None | p=none; |
This policy is essentially a monitoring or reporting mode. It instructs email receivers not to take any action based on the DMARC authentication results. |
| Quarantine | p=quarantine; |
This policy instructs email receivers to mark emails that fail DMARC authentication as potentially suspicious, typically delivering them to the recipient’s SPAM folder. As a result, the DMARC quarantine policy does not fully utilize the protective capabilities of DMARC. |
| Reject | p=reject; |
This policy instructs email receivers to reject (not deliver) emails that fail DMARC authentication. |
The table on this Microsoft Learn page summarizes the options you have when configuring your DMARC policy.
RUA vs. RUF DMARC Reports
-
RUA(Reporting URI for Aggregate reports):- Is designed to send domain owners data about email authentication results for SPF, DKIM, and DMARC. These reports are essential for monitoring how a domain is being used and contain only authentication outcomes and message counts, without including any sensitive email content.
- Combined data on a group of emails
- Not real-time, they are sent everyday by default
- Sent in
XMLformat - No PII (Personal Identifiable Information)
- Supported in all DMARC-compliant mailbox providers
- Is designed to send domain owners data about email authentication results for SPF, DKIM, and DMARC. These reports are essential for monitoring how a domain is being used and contain only authentication outcomes and message counts, without including any sensitive email content.
-
RUF(Reporting URI for Forensic reports):- Is designed to send domain owners detailed failure reports when emails don’t pass DMARC checks. These reports may include portions of the original message headers and metadata, sometimes with limited message content, depending on the reporting provider. The goal is to help identify legitimate sources that need to be properly authenticated. However, due to privacy concerns and the potential exposure of Personal Identifiable Information (PII), most providers do not send
RUFreports.- Details of an individual email
- Sent almost immediately after the failures
- Plain text format
- Contains PII (Personal Identifiable Information)
- Supported in only a handful of mailbox providers, due to the sensitive PII data it may contains
- Is designed to send domain owners detailed failure reports when emails don’t pass DMARC checks. These reports may include portions of the original message headers and metadata, sometimes with limited message content, depending on the reporting provider. The goal is to help identify legitimate sources that need to be properly authenticated. However, due to privacy concerns and the potential exposure of Personal Identifiable Information (PII), most providers do not send
Best Practices and Insights for RUA and RUF DMARC Reports
-
You don’t need
RUFReporting to get a DMARC compliant domain,RUAis sufficient. -
Not all receiving mail servers support sending both
RUFandRUAreports. Most servers typically supportRUA, but this is not guaranteed. If supported, the reports are sent to the addresses specified in the DMARC policy. -
It is not recommended to include multiple email addresses in the
RUAandRUFtags. As a best practice, each tag should be limited to no more than two addresses, as some providers may ignore additional entries when sending DMARC reports. My advice is to limit this to one address whenever possible. If you do need to include more than one, you should format it like this:rua=mailto:dmarc-reports@example.com,mailto:dmarc@example.com; -
DMARC External Validation for
RUA/RUF: If you want to send DMARC reports to a domain different from your own, the receiving domain must explicitly authorize this by configuring a DNS record. This ensures that email providers recognize the recipient as an authorized destination for the reports.- For example, if you’re sending reports to
example.com, that domain must create the following TXT record:yourdomain.com._report._dmarc.example.com, with the value:v=DMARC1; - DMARC monitoring providers, like Valimail, handle this automatically or use wildcard records on their end.
- For example, if you’re sending reports to
Protect all non-sending domains
To protect all non-sending domains, you should consider:
- A deny all SPF record:
- Name:
@ - Content:
v=spf1 -all - Type:
TXT
- Name:
- A deny all SPF wildcard record for subdmains:
- Name:
* - Content:
v=spf1 -all - Type:
TXT
- Name:
- A reject DMARC record:
- Name:
_dmarc - Content:
v=DMARC1; p=reject; - Type:
TXT
- Name:
- An unassociated wildcard DKIM record:
- Name:
*._domainkey - Content:
v=DKIM1; p= - Type:
TXT
- Name:
This protects all of your domains from phishers and spammers, as bad actors will actively look for unused domains to exploit.
To Summarize
SPF: performs verification that the IP address of the sending server matches the entry in the SPF record from the sending domain.
- Purpose: Sender authorization check
- Protect:
RFC5321.MailFrom(P1 Sender)
DKIM: verifies if the public key (DNS record) of a sending domain matches the signed hash created with the private key on the sending server. This is a check that the sending domain actually sent the email, and helps ensure the integrity of the message headers and the email body. DKIM must be configured for each sending server, such as Exchange Online or any other email provider.
- Purpose: Message authenticity verification
- Protect:
RFC5322.From(P2 Sender)
DMARC: ensures that emails failing SPF and/or DKIM validation do not get through, depending on how the receiving server is configured to handle the messages. If the email is unable to pass DMARC with SPF, DKIM can help pass DMARC for the P2 sender domain. Therefore, it is really important to have DKIM enabled for all your sending servers before setting DMARC to reject.
- Purpose: Final sheld on top of SPF and DKIM
- Protect:
RFC5322.From(P2 Sender)